Well, in keeping with my usual holiday tradition, I spent so much time working and getting things ready for the holidays that I ran out of days for my 12 days of DIY! Perhaps I will plan better next year and start them in June! I hope you found the ones I was able to post helpful and I wish you all a very happy holiday season!
Merry Christmas to all and to all... a good night!
Monday, 24 December 2012
Friday, 21 December 2012
On the 8th day of DIY... Homemade Laundry detergent
I started making my own homemade laundry soap about a year ago. It is a great way to go eco friendly and costs just pennies per load. You can make it quickly and easily and put it in a large bail jar or special tin and give as a gift. I found a great post on Soap Deli News that shows you how to make it!
 |
| Photo by Rebecca Dillon of Soap Deli News |
On the 7th day of DIY... Loose Leaf Tea
Loose leaf tea shops are popping up everywhere! For the price of a single cup, you can make a whole jar of your favourite tea blend to give as gifts to friends and family. You can purchase herbs and spices from any herb store, bulk store or health food store. I love Mountain Rose Herbs because they have an enormous selection of organic and wildcrafted herbs and spices at very reasonable prices. For just a few dollars you can make multiple batches of tea for gift giving or enjoying yourself.
I have a few favourites that I enjoy throughout the year. They are very easy to make and only require a few ingredients and some nice containers to put them in. Tea tins make a nice choice for gifting and they come in a variety of sizes to suit any need. You can order them from many packaging suppliers such as New Directions Aromatics, Specialty Bottle or Mountain Rose Herbs.
Recipes
Licorice Mint Soother
1 part Licorice Root
1 part Peppermint
This tea has soothing licorice root which is great for coating a sore throat. The mellow minty sweet flavour is sure to please any herbal tea lover!
Evening Calm
1 part passionflower
1 part lemon balm
1 part chamomile
I love this blend after a hard day. If I'm feeling a bit frazzled, it helps calm my nerves and I sleep like a baby!
My Chai
 1 part cardamom seeds
1 part clove buds
1 part crystallized ginger
2 cinnamon stick (in chunks)
2 vanilla beans (cut up)
3 parts black tea
You can adjust this recipe to suit your taste, but I find this version very rich and yummy! You can also substitute Red Rooibos Tea in place of black tea for a very mellow tea.
Wednesday, 12 December 2012
On the 5th day of DIY...Gift wrapping options
There are so many ways to package a gift that shows you care and they can be done without spending a fortune! Here are a few of my favourites! Now granted, some are easier to make than others, but trust me-you'll have fun doing it!
I found several fun videos on YouTube that teach you how to craft your own packaging from a simple piece of paper or fancy cardboard. You can find the supplies for all of these at your local craft store...or even just around the house! Hope you find them fun and informative!
How to make a pillow box:
How to make a gift box:
How to make an Origami Box:
The last one is my favourite, but as you can see, it is more ambitious than the others. I hope you have fun with this project and save some money on gift wrap!
Tuesday, 11 December 2012
On the 6th day of DIY...Fun with Scrubs!
For this DIY fun day, I am turning it over to the "Queen" of bath and body DIY, Anne-Marie Faiola at SoapQueenTV who did a super episode covering scrubs for the face, body and lips! I couldn't have done it better myself! Without further ado....Take lots of notes, enjoy and don't forget to order your supplies from Brambleberry!
Onthe 4th day of DIY... soy candle fun!

I recently had a grown up play date with my friend Andee to show her how to make soy candles to give as gifts to our friends and family this Christmas. I provided the wax, wicks and smelly stuff... while her task was to find some nice inexpensive holders for our creations. She went to a local thrift store and picked up a whole bunch of great glass containers that were just perfect for our project!
We decided to make soy candles although I also enjoy beeswax too! Soy is known for its soot free, clean burn that lasts and lasts. It holds scent very nicely and is eco friendly. I got mine from New Directions Aromatics, but you can get candle making kits at your local craft store.
 Candle making is a fun and easy project that you can do in your own kitchen with relatively little equipment. All you need is...
a pot
pyrex jug
scale
stainless steel tablespoon
wax of your choice (we used soy because of the clean burn)
dye blocks (optional)
wicks (to suit size of candle)
fragrance oil or essential oils
popsicle stick (you'll see why)
And away we go!.....
First lay out some old newspaper on your pouring surface to prevent any damage and catch spills.

Set up your pot with a bit of water (a la Bain Marie)
Measure out wax in your pyrex jug (I like to work 1 lb at a time)
Turn stove on to medium ish (just under) heat and set jug in pot
Allow time for the wax to melt, stir to ensure even melt
Remove the wax from the heat and turn off the stove
Add your fragrance (1tsp per pound for EO, 1/4 oz per pound for FO)
Shave in colour if desired ( We tried mixing 1/8 of a block of red and a bit of blue, could have used twice as much to get deeper colour)
Wick setting
Now you want to get your wicks set and there are a couple of way to do it. You can use glue dots (highly recommend) or you can just wax set them. The only problem with wax setting them is that your wax will remelt and possibly dislodge the wick from its position. Allowing the wax to cool a bit before pouring is a good way to prevent wicks from moving too much.
 | ||
| Here, I set the wick in place and used popsicle sticks to hold it in place until the candle solidified. |
 | |||
| Voila! Our finished candles! |
Monday, 3 December 2012
On the 3th day of DIY... Lotion Bars
Winter can definitely take a toll on our skin. We all experience dryness, cracking, chapped and red skin during the colder months. Sometimes, regular water-based lotions are not enough. A great alternative is a solid lotion bar. These little bars of goodness are just brimming with nutrients that are ready to go to work protecting and soothing your winter skin. The best part is they are 100% natural and because they don't contain water, they do not need a preservative.
You can make lotion bars using a host of herbal infused oils for added skincare benefit. A few of my favourites include Oatstraw, Calendula, Chickweed or Plantain Leaf. These are all great choices for soothing dry, irritated skin. Of course, you can customize your herbal infusion to use any herbs you wish, but do your research before selecting your plants. I also prefer to use organic or wild-crafted herbs whenever possible. I purchase mine from Mountain Rose Herbs. They have an amazing selection of organic and wild-crafted bulk herbs and other ingredients you'd need for this recipe.
This recipe is a great starter recipe for beginner crafters, but feel free to experiment and make it your own.
What you'll need:
1 mold of choice (I try to use smaller molds, their small size fits in your hand nicely)
Beeswax pastilles ( or candelilla wax for vegans)
Cocoa butter
Shea or mango butter
Essential oils or fragrance oil
Vitamin e
You can also play with different liquid oils, but that will require some adjustments to your proportions. For now, let's just keep it simple.
For this recipe, I have decided to use an essential oil blend that I found in one of my aromatherapy journals Vita Danzare. I out a little twist on it by adding another oil, but thought it would be a great blend to brighten the spirits on gloomy winter days. Our recipe is as follows:
Step one
Pre-measure all ingredients in separate sterilized bowl.
Step two
Melt all of your butters and wax together. You want to do this over medium-low heat. I like to hold mine at 70 degrees for 20 minutes to prevent crystallization or graininess in the finished product. Stir your mixture very well to be sure everything has melted evenly.
 Step three
Remove your mixture from the heat and put in your vitamin e and fragrance oils. Stir gently but thoroughly to incorporate.
Step four
Now we are ready to pour our mixture. You can use pretty much anything as a mold. Dixie cups work great, soap molds in pretty much any shape you can imagine, even muffin tins like the mini one shown here!
 Be sure to pour your oils slowly so you don't get splashes or spills.
 This is what your poured product will look like.
I stick mine in the fridge so they set up faster (about 20 minutes). Once they are hard, you can go ahead and unmold! Drumroll please....

You can make lotion bars using a host of herbal infused oils for added skincare benefit. A few of my favourites include Oatstraw, Calendula, Chickweed or Plantain Leaf. These are all great choices for soothing dry, irritated skin. Of course, you can customize your herbal infusion to use any herbs you wish, but do your research before selecting your plants. I also prefer to use organic or wild-crafted herbs whenever possible. I purchase mine from Mountain Rose Herbs. They have an amazing selection of organic and wild-crafted bulk herbs and other ingredients you'd need for this recipe.
This recipe is a great starter recipe for beginner crafters, but feel free to experiment and make it your own.
 |
| Most of my supplies come from Canadian companies like New Directions Aromatics, Voyageur Soap and Candle Company and Saffire Blue, since I am in Canada. Check your area for local suppliers or go to any health food store. |
1 mold of choice (I try to use smaller molds, their small size fits in your hand nicely)
Beeswax pastilles ( or candelilla wax for vegans)
Cocoa butter
Shea or mango butter
Essential oils or fragrance oil
Vitamin e
You can also play with different liquid oils, but that will require some adjustments to your proportions. For now, let's just keep it simple.
For this recipe, I have decided to use an essential oil blend that I found in one of my aromatherapy journals Vita Danzare. I out a little twist on it by adding another oil, but thought it would be a great blend to brighten the spirits on gloomy winter days. Our recipe is as follows:
- 2 oz cocoa butter
- 2 oz organic fair trade shea butter
- 2 oz organic beeswax pastilles
- 2 vitamin e capsules
- 18 drops lavender EO
- 6 drops litsea cubeba EO
- 6 drops lemongrass EO
- 6 drops ylang ylang EO
Step one
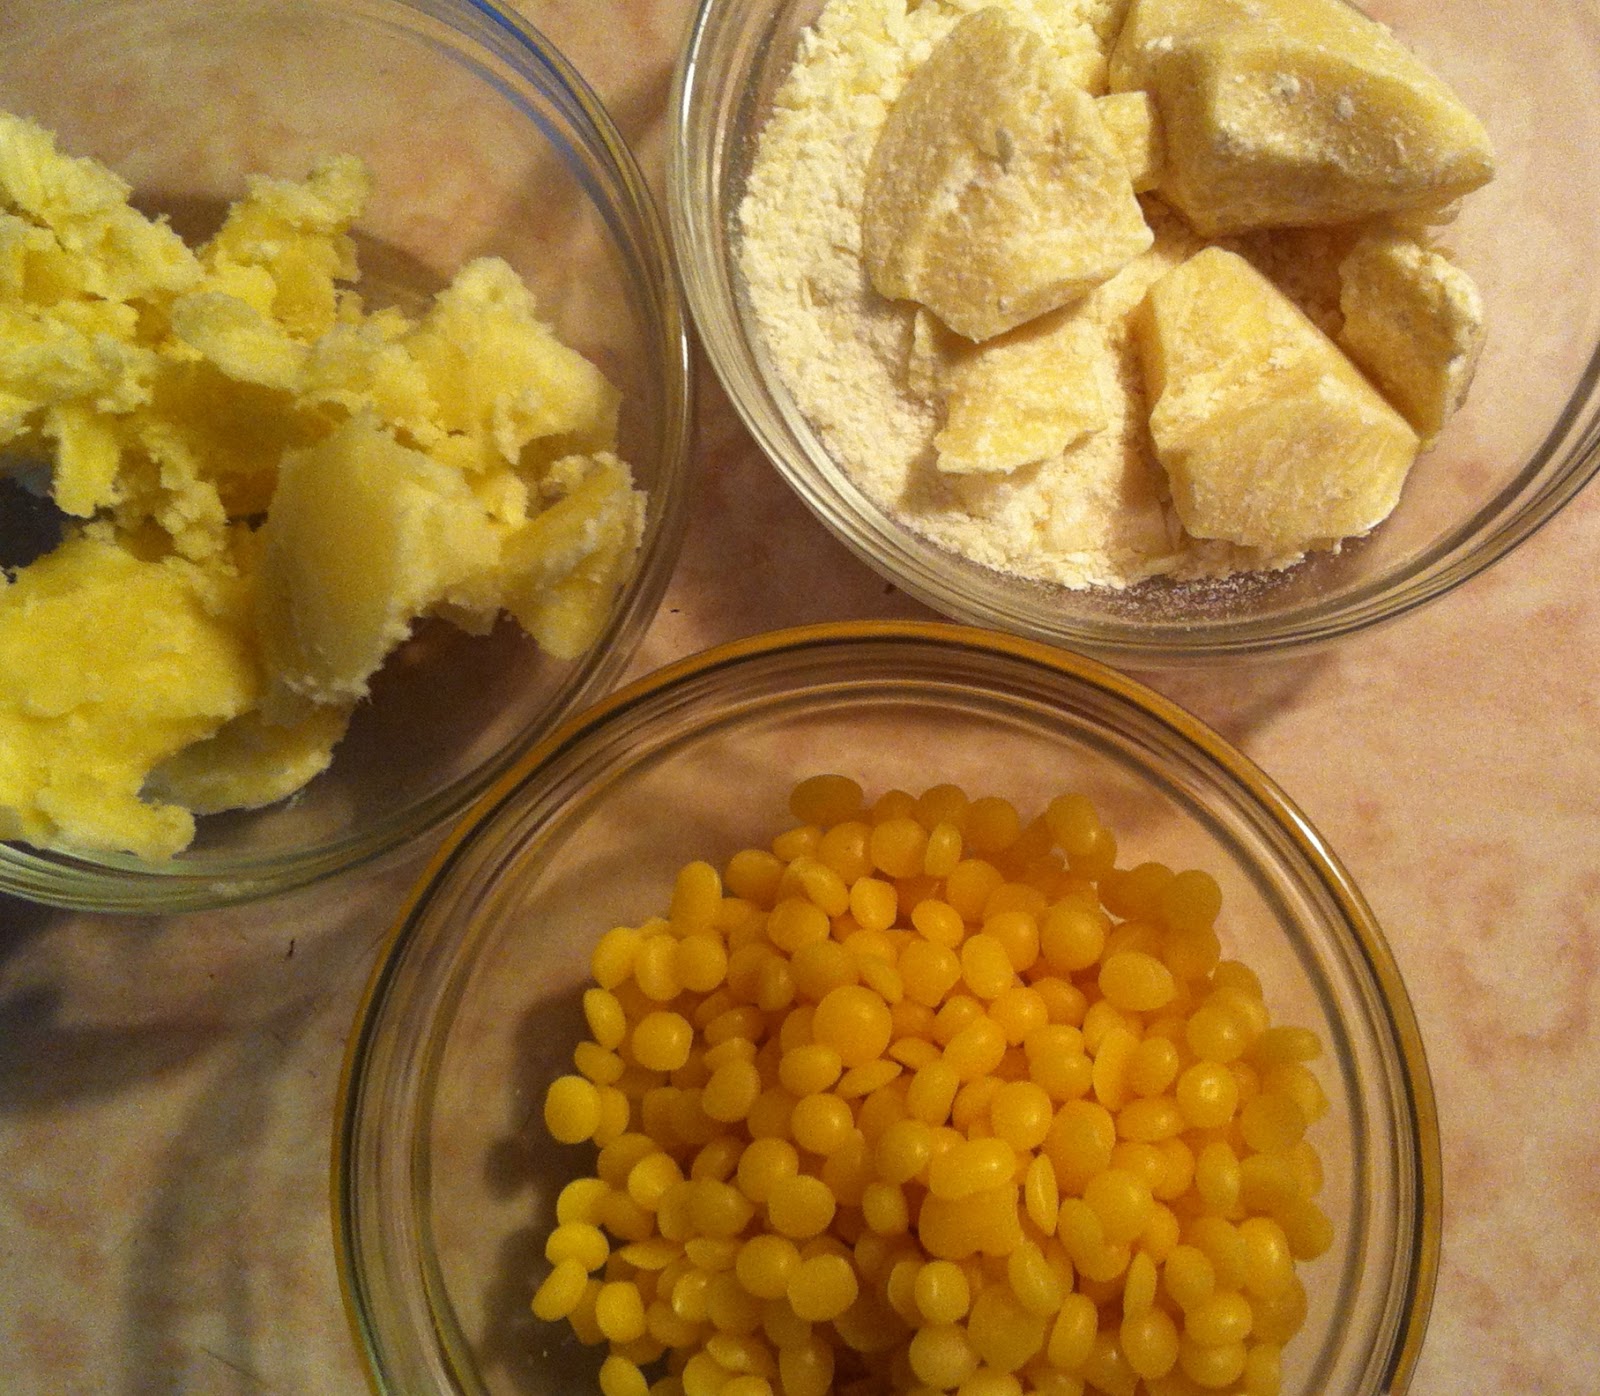 | ||
| Top left- Shea butter, top right- cocoa butter, bottom middle- beeswax |
Melt all of your butters and wax together. You want to do this over medium-low heat. I like to hold mine at 70 degrees for 20 minutes to prevent crystallization or graininess in the finished product. Stir your mixture very well to be sure everything has melted evenly.

Remove your mixture from the heat and put in your vitamin e and fragrance oils. Stir gently but thoroughly to incorporate.
Step four
Now we are ready to pour our mixture. You can use pretty much anything as a mold. Dixie cups work great, soap molds in pretty much any shape you can imagine, even muffin tins like the mini one shown here!

 This is what your poured product will look like.
I stick mine in the fridge so they set up faster (about 20 minutes). Once they are hard, you can go ahead and unmold! Drumroll please....

Okay, ya caught me! These are ones I made with a different mold. But they still came out about the same. The point is, you will end up with a hard bar that melts in your hand at body temperature. These luxurious gems make great gifts and you can package them in little jars or metal tins. You can wrap them in nice white parchment paper with a sticker or ribbon. Whatever you fancy!
Voila! Instant gifts everyone will love!
Thursday, 29 November 2012
On the 2nd day of DIY...Perfume Oil
I LOVE botanical perfumes! There is nothing better to me than catching an occasional whiff of a beautiful aromatic oil! How do I love thee, let me count the ways....

1. Natural perfumes work with your body chemistry, evolving and exposing its many layers in a very subtle way.
2. Botanical perfumes are your own personal smell. People will need to be in your personal space in order to smell it. Unlike synthetic fragrances which can assault your senses from across a room, natural fragrances are uniquely holistic experiences to both the wearer and anyone who is intimately close to them.
3. Botanical perfumes can be created on a whim! You can blend together pretty well any essential oils you want. Of course, I personally recommend a little more thought and care go into your blend otherwise you won't want to wear it. There are a few considerations to make when putting together a perfume blend.
So before we begin, here are a few questions to ask yourself...
What kind of scent so I want?
What mood am I trying to create?
Who is it for? What smells do they like?
Solid or Liquid?
Once you've answered these questions, you are ready to begin. Let's just say for the sake of argument that you are making a stocking stuffer for a young lady or teen. They might like something a little sweeter than a more mature person. So we are going to want our blend to be fresh, sweet and fun.
Grapefruit oil is said to be a scent that makes people seem more youthful, so I want to include that. I also want to add a bit of floral that's not too heavy, so I will add a touch of Ylang Ylang. We also need to make sure our perfume has some staying power so I'm gonna use a touch of Vanilla CO2 (oil soluble). You could also use a drop of Vanilla absolute but is is going to settle out to the bottom of the bottle or separate out of a solid because it's not oil soluble. If you don't mind having to shake your perfume each time you use it, go ahead and use it but I'd probably leave it out of a solid formula.
And just because I like it so much, I'm going to put a few drops of Bergamot in too! It's such a bright, sunny scent that just makes you feel good!
For our base I like to use a combination of Jojoba and Fractionated Coconut oils. They don't go rancid like typical carriers and they are very light and readily absorbed by the skin. Not only that, but they will actually have skincare benefit and make your skin feel softer and smoother...and who doesn't want that!
So here is an overview of the supplies we will need:
1 -5 mL glass roller bottle
2.4 mL jojoba oil
2.4 mL FCO
20-30 drops essential oil blend of choice
Our blend...
8 drops grapefruit oil
8 drops bergamot oil
4 drops ylang ylang oil
2 drop vanilla CO2
If you find this too sweet, you can dilute your ylang ylang first to 10% dilution in a separate vessel using 1 drop of essential oil to 10 drops of base. Then add one drop at a time to your preference.
Any formula can be adjusted to suit your preference.
Once you have your blend made, it's time to mix!
Pour the base into your bottle, careful not to spill!
Add your essential oil blend to the bottle, one at a time. Be sure to swirl before smelling your creation to let the essences mingle a bit, otherwise you'll only smell the last thing you dropped in and won't get the true scent.

Cap it properly and begin to mix by rolling it between your palms and gently flipping the bottle upside down several times. Try not to shake the bottle. We want to treat our blend with some respect!
Once you see an even colour in the bottle (no 'oil strings' as I like to call them) Let your blend sit for about a week so that the notes can mingle and synergize to each other. Trust me, this all important step makes your blend more cohesive and harmonious.
You can also dress it up by packaging it in an easy to make pillow box (that tutorial is coming up next!) and wrapping it with some beautiful ribbon.
Thursday, 22 November 2012
On the 1st day of DIY...Bath Salt Soak
 We begin our 12 Days of DIY series with probably the easiest thing a person can make themselves. This is a tutorial I designed originally as a guest blogger for Christine & Company's "Ask the Expert" Series earlier this year. It's super easy to do and you can adapt it to include any scent you want or colour. All of the ingredients can be found at your local grocery store. For colour, if you don't have any soap colourant handy, you can use food colouring instead.
This DIY Bath Salt Soak Tutorial is a great project to do with the kids, it's fun and clean up is a breeze! Click here to view this wonderful tutorial.
Happy Gift Making!!
Friday, 9 November 2012
Making holiday gift giving more meaningful
With the holidays fast approaching, I am preparing for the onslaught of frustrated holiday shoppers, fighting for parking (when I just need to go to work), and the crowds of pushing and shoving people all for gifts that people will forget they got in a month.... oh wait, that's not what I had in mind!
While it's nice to get all the material stuff one could ask for, all the money that gets spent at retail stores tends to go into very empty notions meant only to sedate the recipient into a false sense of material satisfaction. How do you feel when you get the typical holiday gift compared to the occasional really heartfelt gift that someone took the time to put love and life into- just for you... I don't know about you, but that gives me the warm and fuzzies!
If you don't have the time to do-it-yourself, why not consider skipping the mall and instead opt for something unique from any of the wonderful handmade and vintage shops on Etsy? This is a treasure trove of one of a kind, unique hand crafted items which many artisans have poured their heart and soul into making for the right person. For those who are looking to create more meaningful gifts to give this holiday season, I have planned a "12 Days of DIY" Holiday gift making series. We're gonna have lots of fun making awesome gifts that are easy on the wallet and will score big brownie points in the thoughtfulness department. We will explore gift options that use ingredients and materials that are readily available at your local grocery, health food or craft stores. I'm even gonna show you how to create your own eco-friendly giftwrap! Get ready to have a fun filled holiday that gives you as much as the person getting!
Ready...Set...Gift!
Wednesday, 7 November 2012
The Bath Lover's Ritual...
I LOVE baths! I actually have cravings for them! If I want to truly feel pampered and reconnect with myself and my sense of well-being... for me nothing beats a good long soak with lots of bubbles, fragrant essential oils, rich butters, detoxifying salts, dried herbal tea concoctions....or whatever else my little heart desires. A bath in my house never consists of plain ol' water. It just isn't done!
The art of the aromatic bath has roots dating back to Queen Cleopatra of Egypt. Her bathing rituals included soaks in fresh milk, rose petals, jasmine flowers and other exotic aromatics. Today, we use the very same ingredients to create a hydrotherapy experience that does much more than just help make us clean.
With the right set of ingredients, aromatic baths can be used as to aid your personal wellness for whatever it is you need to balance. For some, aromatic bathing is a deeply spiritual way to purify the mind, body and soul of negativity and prepare one to connect with deity/spirit/God.... For others, it can be a way to relieve stress, uplift mood, be a time for meditation or simply a way to pamper and nurture the skin.
A lot of mindfulness goes into a bath 'ritual'. It's not just running some water, throwing in some smelly stuff and sitting there until you're a prune. To get the most out of your bath time ritual, consider the following when preparing for your spaaaah time...:)
1. Choose your ingredients... What do you want to experience today? Are you trying to relieve stress? Is it your 'womany' time of month? Is your skin in need of some TLC? Did you pull a muscle? Overindulge during the holidays? By customizing the ingredients for your bath according to what you are trying to balance, you will get the most benefit from your experience. Some ingredients are better suited to certain times. Below are a few recipes to get you started. I encourage you to do lots of research on various ingredients before selecting them as they may not be for everyone.
2. Clear time...You can't have a relaxing experience and focus on your healing if you are running through your 'to do list' in your head! Find a time that fits your schedule best. It could be at the end of the day, once a week, on a day off...It doesn't really matter as long as you have time to be undistracted for at least 20 minutes. Try to make it a time when you don't have anything else really to do afterwards...before bed is my favourite time!
3. Set the mood... Light dimmers are awesome for this! Have low lighting so you don't have eyestrain. If you like, light up an aromatherapy candle or 2 in a safe area of the bathroom where they won't get knocked over. If using a scented candle, try to stick to aromatherapy ones that use essential oils instead of fragrance oils. And be sure they do not interfere with the scent of the aromatics you've chosen for your bath. Get your 'bath blend', towels, robe, slippers and after bath oil or moisturizer ready so you don't have to go searching for things. Last but not least, close the bathroom door.
4. Prepare your space... With everything ready, run a warm bath. Try to avoid making the water too hot as this will zap the skin of hydration and prevent you from having the most comfy experience possible. Put your chosen bath blend into the tub as appropriate. If using bubbles or herbal bath bag (under running water), if using salts, milks, bath bombs or melts (place into full tub just before getting in).
5. Prepare yourself... This is so important! You need to be in a state of receptiveness in order to absorb all elements of the holistic experience you are about to have. Take a few deep breaths of your blend as it wafts in the warm vapour. Give yourself a chance to clear your mind and find yourself in just that moment. Give thanks to yourself for allowing your body, mind and spirit this healing time.... okay, now you're ready to hop in! Do be careful entering and exiting if you've chosen ingredients that can make the tub slippery.
 6. Enjoy the hydrotherapy... Feel yourself become immersed in this bevy of goodness... a cocoon, if you will of wellness. Breath deeply to let the essential oils into your limbic system and absorb into the body. Feel the sense of the ingredients going to work on the areas that need help. Feel the tension melting, muscles relaxing, mind calm, skin getting nourished. Be fully and completely in the moment. Use the time to meditate if you wish, reconnect with your energies focusing on your breath and feeding the body prana (life force energy). Feel the auric body as well as the physical be cleansed of any energy blocks, negativity, emotional blocks....
7. Finishing your ritual bath... Once you feel that you've achieved a sense of balance, clarity, calm and wellness, it is time to release the water. Remain in the bath for a bit as the water drains. Imagine all the 'junk' you just lifted from yourself sinking down through the pipes leaving only a being of perfect health. Imagine all that junk returning to the earth where the energy is made neutral. Feel yourself lighter, fresher, peaceful. Exit the bath carefully, pat dry with a towel. While your skin is still damp, apply your favourite after bath oil or moisturizer. Wrap yourself in a warm, cozy robe, put on your slippers and snuff out the candles.
Go make yourself a cup of your favourite tea, rest and bask in the beautiful warmth of wellness you've gifted yourself!
(Don't forget to clean your tub of any residue later on.)
Now THAT my friends is what you call a Bath Ritual! Happy bathing!
Recipes
 Ginger Milk & Honey Warming Bath
This sweet and spicy blend is a great one for warming up the extremities in winter and giving a sense of comfort
Use 1/2 cup per bath
1/2 cup milk powder (whole, goat or coconut)
1/4 cup honey powder
1/2 cup dead sea salt
4 drop ginger eo
6 drops cardamom eo
6 drops ylang ylang eo
3 drops clove bud eo
2 drops vanilla absolute
*Do not use if you are pregnant or nursing. Contains essential oils that may be irritating to sensitive skin. Use caution. You can reduce the amount of essential oil to half of desired.

Lavender Therapy Mineral Soak
Perfect for promoting relaxation and soothing the senses after a long stressful day
Use 1/2 cup per bath
1/2 cup dead sea salt
1/2 cup epsom salt
1/4 cup baking soda
50 drops lavender eo
Garden Soother Herbal Bath Tea
This lovely bath tea uses the natural aroma of dried plants and flowers for a delicate, yet effective aromatic experience
1/2 cup whole oats
1/4 cup calendula petals
1/4 cup plantain leaves
1/4 cup rose petals
1/4 cup lavender flower
**All rights reserved. Recipes here are the property of Alchemy Lifestyle & Wellness and may not be copied without written permission.
Thursday, 25 October 2012
Would you like water with that?
 One thing that plagues every single crafter of natural bodycare, is the dreaded "emulsion". By this I mean lotion making. See the thing is, there are so many factors to consider when one decides to delve into the world of water based lotions. For instance, of course there is what ingredients to use....What type of feel are you looking for, what kind of skin is it intended for, do you want it to finish powdery or do you want it to coat the skin? Is it slippy enough, or do you want it to be a stiffer cream?...The list of considerations is endless!
Then of course, there is the preservative issue. Let me just say right off the bat that there is NO evidence that Grapefruit Seed oil will provide any kind of broad spectrum protection. It is NOT a preservative, it is an anti-oxidant. Secondly, there are a LOT of people out there making creams and lotions with water based ingredients that do not preserve their products. This is a very bad idea! If you come across one of these, run the other way! As soon as water is introduced into a product, there is surely going to be mold and pathogens to follow. If the product is not preserved properly, you are putting yourself at serious risk from contamination, bacteria, mold and pathogens. Most of the little beasties found in contaminated products is invisible to the naked eye!
That said, eventually every emulsion will break, or fail. The preservative becomes less effective over time and the product expires. I recently had this happen with one of my lotions that I made for myself and it had a very good preservative in it. So, what to do? With all the challenges that water based emulsions give, I for one am going to explore more anhydrous formulation! Besides, we as a society need to understand that one of the reasons we are hooked on the idea of 'snow white lotions' is because that's what we've been led to believe will help us.
The truth?... hold on to your hat! Water is a cheap filler! It accounts for about 65-80% of any store bought lotion! (I know, I just felt your mind get blown!) Yes, ladies and gents, the reason lotions are cheap (most of the time) is because only 25-39% of it is actual nourishing ingredients, and that's provided they haven't loaded it with other fillers to make it feel better which can take up another 10-15% of the finished product. So all the 'good stuff' on the ingredient label- the plant oils, extracts, vitamins, minerals...that is all in there at the smallest percentage possible to still make it to the label!
We've been trained to think that white = pure. It seems more innocuous to us and therefore it must be good. Nope! In fact, all we are doing most of the time is slathering on a chemical cocktail of fillers with no real skincare benefit...apart from "feeling good". The immediate gratification we have been getting from a product seem to outweigh the real long-term benefits to maintenance of healthy skin. Plant oils and butters are naturally compatible with the skin as they are both living organisms. These ingredients have the nutrients to feed the skin and keep it healthy, much the way fruits and vegetables feed the insides of our body. Even though at first, they can seem heavy and greasy, once they've had a few minutes to be 'digested' by the skin, they are fully absorbed and doing the work they are intended for.
Now don't get me wrong, when done right- and with a decent amount of consideration, lotions can be lovely! But for the bulk of our daily skin health, why not consider oil based options? There is no doubt amongst the studies conducted on this subject, that oil based skincare is extremely beneficial to a number of skin concerns from eczema to acne. That knowledge combined with the fact that mold is not an issue in anhydrous formulas make a pretty good case for eliminating water-based skincare from your routine. Keep in mind, just because they don't need preservatives, doesn't mean they can't hold bacteria! Keeping wet and dirty fingers out of the jar or bottle is still important. I always use good manufacturing processes including proper sterilization of tools, bowl and work surfaces to prevent contamination when I make a product, even if it's for myself.
The whole point of moisturizing the skin is to lock in water. Well, (prepare for mind to blow again!).... oil seals in moisture, especially right after a bath or shower. (insert exploding sound here) Ergo, oil based moisturizers make a whole lot of sense don't ya think? The next time you go to buy skincare, consider all your options. Try a lovely after bath body oil or natural butter. Trust me... your skin will love you for it!
Thursday, 4 October 2012
The Joy of Monoi!
From the time I was a little girl, I have had a special place in my heart for the aroma of Gardenia flowers. I remember smelling their beautiful aroma in a body oil for a fleeting moment. From that day on, I have been on a relentless search to recapture that delicate, powdery, sweet floral scent to no avail. As time passed, all I found were cheap synthetic imitations that don't even come close to capturing the magic of that first aromatic memory.
Recently, I have been drawn to exploring the beautiful natural ingredients indigenous to the South Pacific. I have discovered a plethora of herbal traditions from the French Polynesian colony of Tahiti. These traditions are part of the Tahitian Pharmacopeia known as the Ra'au Tahiti. The people who preserve this knowledge, the Mahoi- learned to live in harmony with the life force they call Mana. Their tradition has taught them to use her gifts as a means to reconnect with the elements of the world around them. The rituals they have created with the use of natural ingredients for healing are the true legacy of holistic healing.
Although I have become very familiar with several natural healing ingredients such as Organic Virgin Coconut Creme de Coco and Tamanu oil, the one that is most highly prized is the sacred Monoi de Tahiti.
Upon first inhaling this intoxicating oil, my brain immediately took me back to that moment when I first coveted the aroma of Gardenia! But, this is not just any gardenia- no, no, no. This is the pure, unadulterated scent of Gardenia Tahitensis or Tiare flowers, a species exclusively cultivated in this region of the world. It is created in a strict traditional manner that is over 2,000 years old.“Monoi de Tahiti is the product obtained by macerating Tiare blossoms in refined coconut oil. This oil is to be extracted from mature coconuts gathered from Cocos Nucifera trees growing in the coral soil in the geographic area of French Polynesia exclusively. Only "Tiare" flower buds from the Gardenia Tahitensis species and of Polynesian origin are acceptable...” (definition according to the Appellation of Origin; Institut du Monoi)
So what does Monoi de Tahiti have to offer besides a scent that will bring you to your knees? It is one of the most ancient preparations in the Ra'au Tahiti. Studies have shown that it is a very useful healing oil for all manner of conditions from eczema to headaches and haircare. It has been clinically tested and determined to be highly effective for smoothing the hair shaft and improving hair and scalp health. Monoi is also highly tolerated by even the most sensitive skin so it can be safely used on babies and those with a variety of skin conditions without risk of irritation.
Profile
Monoi de Tahiti
INCI: Cocos Nucifera, Gardenia Tahitensis
Characteristics: liquid at ambient temperature, solidifies at cooler temps
Colour: clear to slightly yellow
Aroma: floral, slightly powdery; medium
Absorption: quickly absorbed, light feel with no greasy residue
Usage rate: 1-100%
Wednesday, 3 October 2012
What does it mean to live a life of alchemy?....
Alchemy is a philosophy that can simply be defined as 'the art of transformation.' For me, it is all about taking elements of life and with lots of love and positive intention, transforming them into things of beauty in every aspect of my world. Whether it is capturing the life essence of a flower, re-purposing a glass jar to make a beautiful gift, inspiring a new way of thinking, or even taking daily routines and turning them into luxurious rituals of pampering-- alchemy is at work everywhere.
Consider this your one-stop-shop for tips & tricks, DIY projects, health & beauty recipes and so much more to help you find new beauty in your world and live a healthy, beautiful life.
Welcome to the world of Alchemy!
Hi Everyone!
So here we are in our new blog home! I for one am very excited. I have rethought my format and have decided to make this a much more grassroots blog that will be as much yours as mine. In it, I will be sharing everything from new products and promotions that are being offered in mine and other favourite Etsy shops. I will be posting lots of DIY projects, beauty, food and lifestyle recipes and features. I will talk about all things aromatherapy and natural beauty and show you wonderful ways to add a little bit of ‘alchemy’ to your life! I hope you will enjoy sharing this journey with me!
For now, this cool autumn air has me craving a cup of tea. See you all soon!
Lots of love,
Steph xo
Subscribe to:
Posts (Atom)